COSTUMES
STAR WARS EPISODE IV: A NEW HOPE
PRINCESS LEIA CEREMONIAL GOWN (AKA CELEBRATION GOWN)
PHOTOS | DRESS OVERVIEW | CONSTRUCTION TIPS | NECKLACE RESEARCH | BRACELET
CONSTRUCTION TIPS
BODICE
|
|
TOP
IMAGE: BODICE FRONT NECK AND ARMSCYE FACING The neckline seems to be finished off on the inside with a facing roughly 1.25" wide. A facing is applied to the arm cycles as well.
|
 CLICK TO ENLARGE |
 CLICK TO ENLARGE |
|
|||

|
|
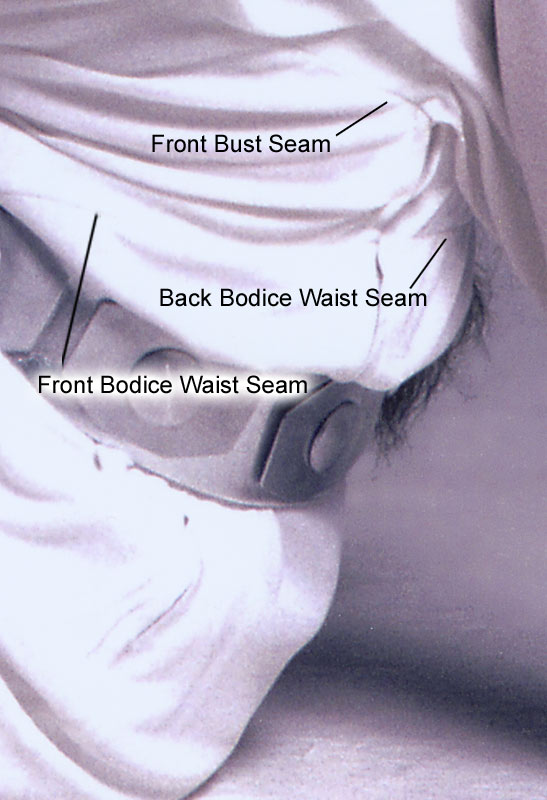
TOP IMAGE: BODICE SIDE BODICE
FRONT - The neckline of the bodice is U shaped. This
costume is not an empire waist as it appears at first glance. The
bodice is actually made up of 2 sections. The upper panel covers
the bust and has an upside down V shape seam line. There is a second
lower bodice panel beneath the bust line that ends at the waist
where the skirt is attached. This waist seam is usually hidden by
the belt, but can be seen in the photo to the left. I
believe that the front skirt seam is probably slightly V shaped
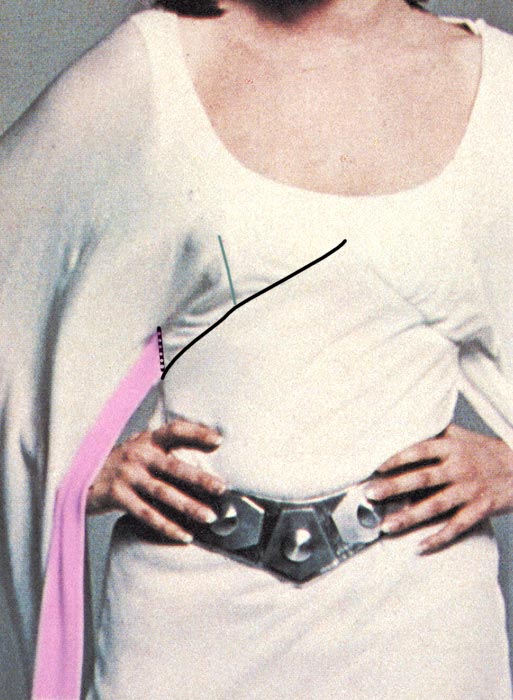
to follow the line of the belt. BODICE BACK - The back of the bodice extends down to the waist, where it meets up with the seam line of the lower front bodice panel. The back of the bodice has the same sheer overlay fabric used on the skirt. Simply baste the sheer layer on top of the opaque layer and then treat them as one piece. DARTS - In some photos it appears that there might be a dart sewn into the opaque fabric under layer in order to help shape the bust (see photo to the left. The dart is highlighted with a blue dotted line). It's unknown if darts are sewn into the the back of the bodice near the waist to help in fitting (some dress patterns do call for this - and I did use darts in the back of my gown). FRONT OVERLAY - The overlay/sleeve portion on the front of the bodice is also made with the same sheer fabric used for the skirt overlay. Although there are no darts in the bust like the opaque layer, there is a fold or tuck worked into the left side of the bodice that seems to run parallel to the center V seam line of the bodice. The sheer layer is sewn to the neckline after the facing has been sewn in. It appears to fold over the edge of the neckline and be sewn down by hand about 1/4" - 1/2" from the edge. (see photo to the left) HOW TO GET A NICE SMOOTH V - First mark with chalk the point at which the seam of the bodice and skirt will meet at a point. Mark this on both the skirt piece and the bodice. Also make tack marks about an inch from the center point along the seam to use as a guide when lining up your pieces. Stay stitch the opaque under layer just inside of the seam line around the V area. Then clip the seam allowance in the center stopping just shy of your stay stitching and the chalk point. |


SLEEVES - A.K.A. 'WINGS'
|
|
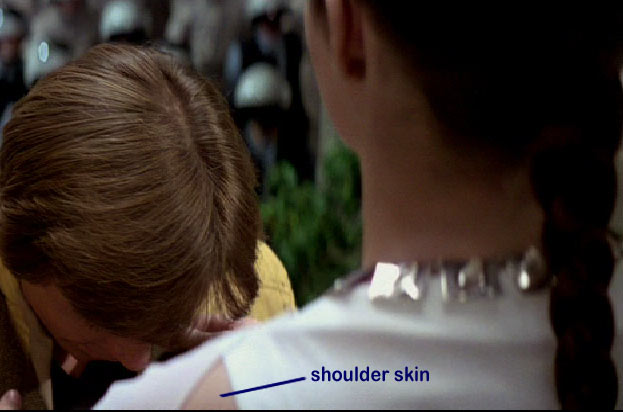
TOP IMAGE: SLEEVE GAP WHEN ARMS MOVE FORWARDThe sheer layer on the front of the bodice is unusual because it is actually part of the sleeves or "wings" of the gown. Yes - the sleeves and the front overlay of the bodice are all one huge piece! Imagine putting a cape on backwards so it hangs in front of you. Cut away the excess fabric in the center front so that it meets up with the empire waist seam just below the bust. The part of the cape over the arms remains long and drapes to the ground. This is the best way I can verbalize the idea behind these sleeves, which are not really sleeves because they only lay on top of the arm. The "Wings" hang freely in the back. They are only tacked at the top of the shoulders at the neck line, and actually can swing forward exposing the shoulders. (See the screen capture to the left.) The edge of the sleeve is highlighted in blue at her shoulders. It is only sewn down at the edge of the neck, not along the blue dotted line. There isn't any pattern that exists for this unusual style, but thanks to the help of Fenig Durak and a lot of trial and error - I came up with a pattern that is generally like the sketch at the left (note it's not exact or to scale. It's just there to give an idea of what to aim for). You will also see a photo of an early mock-up of my sleeve to the left. The bodice pattern is placed on top to show you how the sleeve overlay is actually a part of the bodice. (I believe I made further alterations to angles and drape of the design after creating that test piece). The sheer front bodice layer is folded under as it extends out of the side seams. (See the highlighting in pink in the photo below.) It is possible that if a nylon/tricot was actually used on this costume that the sleeves of the movie costume were not finished with a hem. If you use georgette it will need hemming. (I hand rolled the hem to keep if very soft looking. Machine rolled hems will work also).
LEFT IMAGE: Pink Highlight = sheer fabric folded under as it extends out of the side seam. Black Lines = seam lines. The Sleeve is only stitched down about 2" up the side seam. Green Line = Bust dart in opaque under layer of the dress. |

SKIRT
|
|
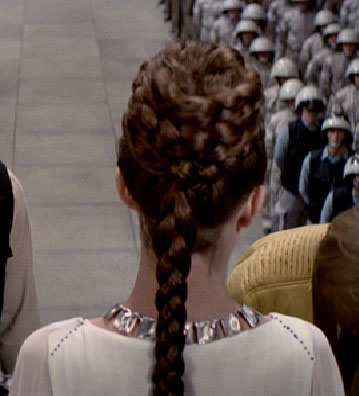
LEFT IMAGE: TRAIN DETAIL SKIRT CONSTRUCTION - The skirt is A line in shape. It was recently discovered that the dress has a train in the back (see photo to the left). The skirt consists of an outer sheer layer which hangs free of the opaque layer underneath. A french seam should be used on the outer sheer layer. To assemble the skirt, first sew the side seams of the outer layer (stop on the left side just beneath where the zipper will later be inserted). Next, sew the side seams of the inner layer. Slip the outer layer over the inner layer and baste the two together along the top edge where it will join the bodice. 2 darts may be sewn into the back near the waistline as well. ATTACHING SKIRT TO BODICE- After the bodice has been completed, match the chalk marks (as discussed above) where the center front point of the bodice meets the center front of the skirt. Be sure to start sewing the front panel of the bodice at the exact point where your side seams will be sewn (that would be 5/8" inward if you have a 5/8" seam allowance) in order to avoid catching the free hanging sleeves into the side seam allowance. Sew to the center V point, lift the presser foot and realign the fabric, then sew outward to the other side seam. With the back of the bodice and skirt it is OK to sew from seam allowance edge to seam allowance edge. LEFT IMAGE: HEM DETAIL HEM - The hem of the outer and inner layer is about 1.5" deep. Overcast or serge the edges to keep them from unraveling, and then sew the hem by hand using a blind hem stitch. As is the case with dresses and skirts using an overly, be sure that the inner layer is slightly shorter than the outer layer. |